How Lenses Focus Light in a Camera Obscura
See how lenses focus light in a camera obscura, brighten its projected scene and differ from a pinhole, with a safe setup you can adapt at home.
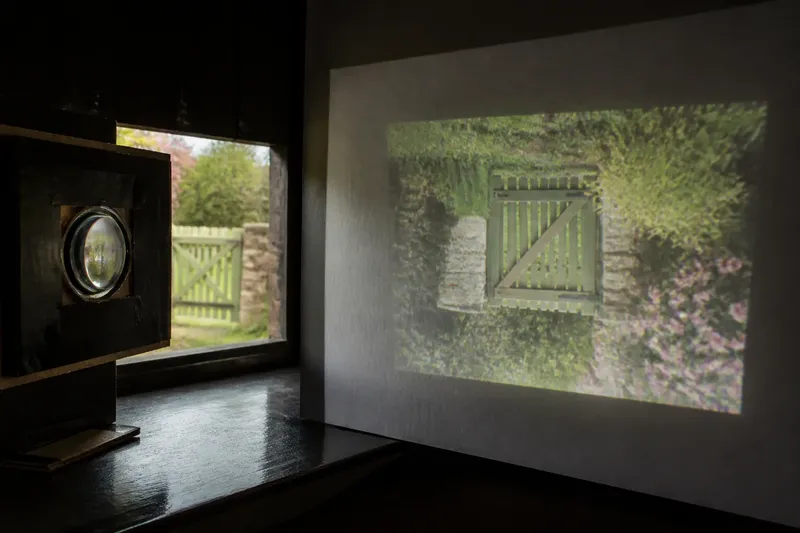
Lenses focus light in a camera obscura to make a brighter, more usable projection than a pinhole alone can provide. Put a convex lens in an opening facing a bright scene, and the rays it bends can meet on a screen inside a darkened room.
What the lens changes
A pinhole forms an image by admitting a narrow set of rays from each point in the scene. A lens takes a different approach: its curved surfaces refract light, bending rays towards a common focus. That lets more light through while still bringing rays from a scene point to a limited area on the screen.
The result depends on the lens and the distances between the scene, lens and screen. A convex lens can form a real image on a surface behind it when the scene is far enough away. The image is usually inverted, as in a pinhole camera obscura, but the lens can make it brighter and allow more detail to be seen.
A lens does not simply make every projection sharper. If the screen is not at the focus, the image blurs. Lens shape and quality also affect clarity, while stray light can reduce contrast regardless of how well the lens focuses.
Set up a safe projection
Use a darkened room, a white sheet or matt card as the screen, and a lens mounted securely in a card frame or a purpose-made holder. A magnifying glass can serve as a convex lens if it is held steady and directed towards a bright outdoor scene. Do not look at the Sun through a lens or point a concentrated beam at people, pets or flammable material.
For a window setup, darken the room and cover the window with opaque card, leaving an opening sized to the lens holder. Do not cut while the card is fixed in place. Prepare the opening on a stable surface with an appropriate craft tool, following its instructions; keep hands clear of the cutting edge, or ask an adult to do the cutting. Fit the lens without gaps around its frame, then place the screen opposite it.
Keep the lens and screen movable so you can adjust their positions without forcing the frame. If the image is faint, first reduce light leaking around the window covering. If it is bright but blurred, move the screen gradually until edges look clearer.
Finding the focused image
Focus is the position where rays from each point in the scene converge most nearly on the screen. In practice, move the screen a little at a time and watch a clear edge, such as a roofline or window frame. Stop when that edge looks most distinct, then check whether other parts of the scene are acceptably clear.
Say you have a hypothetical setup with a magnifying lens in a card frame, a white sheet opposite it and a bright garden beyond the window. You darken the room, cover gaps around the frame, then slide the sheet towards the lens until a garden gate looks clearest. The resulting image is inverted and brighter than the pinhole view, but the gate and nearby plants may not both look equally sharp; that trade-off tells you the screen is focused for one range of distances rather than everything at once.
Do not keep changing the aperture to solve a focus problem. A lens needs the screen in the right position; a pinhole’s clarity comes from restricting rays, not from bringing them to a lens focus.
Lens or pinhole?
A pinhole is simple and robust: it has no focusing distance to adjust, but its small opening admits little light. A lens can produce a brighter image and collect rays over a larger opening, but it needs careful alignment and a screen position that suits the scene.
- If the projection is too dim: check for light leaks around the covering; if the room is already dark, try a securely mounted lens rather than making the pinhole smaller.
- If edges look blurred: check whether the screen is movable; if it is, shift it slowly to find the clearest position, otherwise use a pinhole for a simpler image.
- If the image has washed-out contrast: check for stray light in the room; if gaps remain, cover them, otherwise reduce other light sources near the screen.
- If the whole scene does not fit: check the lens-to-screen arrangement and the scene framing; if the view remains too narrow, reposition the camera obscura rather than forcing the lens.
- If colours look muted: check whether the scene is brightly lit and the screen is clean; if not, choose a brighter view or wipe the screen, otherwise accept that dim projection weakens colour.
- If the lens frame shifts: check that it is supported without wobbling; if it is loose, secure the holder before adjusting focus, otherwise proceed with small screen movements.
It is not worth polishing the outside of a lens or decorating the room before the screen is positioned and light leaks are controlled. Those changes do little for focus or contrast.
Questions about lens focus?
Does a camera obscura need a lens?
No. A pinhole can form an inverted image without a lens by restricting the directions of incoming light. A lens is an optional way to collect and focus more light.
Why is the lens image upside down?
Rays from the top of the scene are bent through the lens towards the lower part of the screen, while rays from the bottom reach the upper part. Their paths cross as the lens focuses them, producing an inverted image.
How do I focus a simple lens?
Keep the lens fixed and move the screen slowly until a clear edge looks most distinct. If no position gives a clear view, check that the lens is convex, securely mounted and aimed at a bright scene.
Can I use a magnifying glass?
A magnifying glass with a convex lens can project a scene onto a screen when arranged in a darkened space. Never use it to view the Sun or direct concentrated sunlight towards a person, animal or combustible surface.
Reading the projection
A camera obscura makes the path from scene to image visible: light enters through an opening, the lens redirects it, and the screen receives the result. The projected colours come from the light in the scene, though dimness can make them seem subdued.
When comparing a lens with a pinhole, note the actual trade-off: a lens can brighten the projection, but alignment and focus matter; a pinhole is less demanding, but its image is dimmer. For a useful lens focus demonstration, judge one clear edge first, then decide whether the rest of the scene is sharp enough for what you want to observe.